Monday 4 July 2022

New Handbound Leather Journals


 Here are my latest Handbound Leather journals for sale. 

Leather Journals wrapped with strap with a stone attached.

1.  A rich gold brown colour leather with dark blue straps around the spine, and the wrapping strap is a quite dark green colour. The stone is actually a small shell.


2.  A dark green colour leather with dark blue straps around the spine, and the wrapping strap is a deep medium  brown colour. Has a semi-precious creamy coloured heart stone charm. SOLD


3.  A deep brown colour leather with dark blue straps around the spine, and the wrapping strap is a rich gold brown colour. Has a semi-precious ball charm.  SOLD


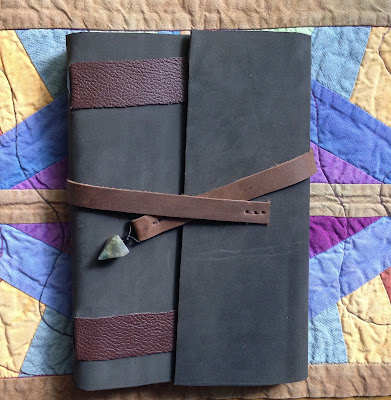
4.  A dark green colour leather with brown straps around the spine, and the wrapping strap is a deep medium brown colour. Has a semi-precious greeny-gray stone charm.   SOLD


5.  A rich gold brown colour leather with dark blue straps around the spine, and the wrapping strap is a quite dark green colour with a rich blue stone charm.


6.  A deep medium brown colour leather with brown straps around the spine, and the wrapping strap is a rich gold brown colour. Has a semi-precious turquise coloured stone charm.


Leather Journals wrapped with a strap with a charm attached


7.  A navy blue colour leather with wrapping strap in a dark brown colour. The flower charm is a tarnished silver finish.


8.  A navy blue colour leather with wrapping strap in a dark brown colour. The key charm is a brass finish.  SOLD


9.  A rich gold brown colour leather with brown straps around the spine, and the wrapping strap is a quite dark green colour. The bird charm is a tarnished silver finish.


10.  A deep medium brown colour leather with dark green straps around the spine, and the wrapping strap is the same deep medium brown as the cover with a brass key charm.


11.  A dark green colour leather with deep red straps around the spine, and the wrapping strap is a rich gold brown colour. Has a silver peace sign charm with a tarnish finish.  SOLD


12.  A dark green colour leather with light blue straps around the spine, and the wrapping strap is a rich gold brown colour. Has a silver key charm with a tarnish finish.


13.  A rich gold brown colour leather with deep red straps around the spine, and the wrapping strap is a quite dark green colour with a tarnish finish silver horse charm.  SOLD


14.  A deep medium brown colour leather with dark blue straps around the spine, and the wrapping strap is of the same leather with a shiny silver coloured leaf charm.


Leather Journals with a leather sliding button closure

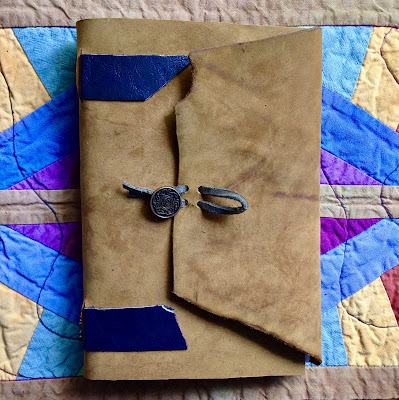
15.  A rich gold brown colour leather with dark blue straps around the spine, and a sliding strap metal button closure.


16.  A deep medium brown colour leather with a sliding strap and gold coloured metal button closure.


17.  A rich gold brown colour leather with a sliding button closure. Button is repurposed, black with a coat of arms.


18.  A deep medium brown colour leather with a sliding strap metal button closure. Repurposed gold coloured button, with shiny pearl-look centres.   SOLD


19.  A dark green colour leather with a sliding button closure—repurposed gold coloured button with pearl-look centre. SOLD


20.  A rich gold brown colour leather with sliding closures - two brushed gold-coloured buttons. SOLD


21.  A dark green colour leather with sliding closures—two repurposed shiny gold-coloured button.


Leather Journals with cotton cord sliding button closure

22.  A dark green colour leather with dark blue straps around the spine, and a repurposed metal button with a sliding cotton cord and small gemstone.   SOLD


23.  A deep medium brown colour leather with deep red straps around the spine, and a repurposed metal button with a sliding cotton cord and small gemstone.  SOLD


24.  A dark green colour leather with dark purple straps around the spine, and a repurposed metal button with a sliding cotton cord and small gemstone.


25.  A deep medium brown colour leather with dark purple straps around the spine, and a repurposed metal button with a sliding cotton cord and small gemstone.  SOLD


26.  A rich gold brown colour leather with brown straps around the spine, and a cameo button with a sliding cotton cord and small gemstone.


27.  A rich gold brown colour leather with deep red straps around the spine, and a repurposed metal button with a sliding cotton cord and small gemstone.   SOLD


If you are interested in purchasing any of these journals, please contact me by leaving a comment below. They are 8.75 x 6".  The pages are made from  acid-free paper, so it is suitable for sketching, journalling, and even mounting photographs. Cost per journal is $65.00 Canadian plus shipping. I accept etransfer. You can also contact me on instagram whatthesehandsmake


Smaller Leather Journals

I have a few journals that are a bit smaller, but with the same acid-free paper. Each book is 6" wide by 7.25" high. Price of each is $55.00 Canadian plus shipping.

28.  Khaki coloured leather cover with button strap closure and pink gemstone bookmark.


29.  Red brown coloured leather cover with wrap strap closure and labradorite gemstone bookmark.


30.  Red brown coloured leather cover with wrap strap closure and labradorite gemstone bookmark.   SOLD


31.  Shiny purple leather cover with green strap button closure and amazonite gemstone bookmark.   SOLD


Thursday 9 June 2022

Make Custom Skin Creme with Natural Ingredients


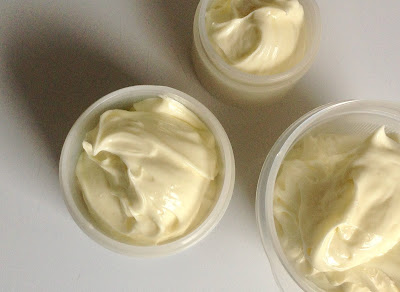
If you are like me and have sensitive skin, it is wonderful to be able to make a skin creme/moisturizer yourself. With a basic recipe, you can choose the ingredients that work for you.  And you can vary them from batch to batch.  

DIY creme/lotion recipes are composed of oils and waters, and they do not mix together naturally—oil is lighter and floats on water.  So a way to emulsify these ingredients is needed.  There are two ways to do this: 

  • Use a chemical emulsifier such as borax.
  • Use a mechanical method to emulsify, such as a blender.
Even when using borax, you will still need to do a bit of mixing by hand—or with a hand-mixer—to make sure that the creme is evenly emulsified.

The recipe I am sharing is from Herbal Healing for Women by Rosemary Gladstar, an American herbalist. I highly recommend her books. I have used many of the recipes in this particular book to great effect for myself. This recipe involves using a stick blender (my variation).  It is very similar to making mayonnaise.


Both methods benefit from using a wax to help thicken the creme.


DIY Natural Skin Creme 
Group 1 Ingredients (oils and waxes)
  • 2/3 cup liquid oil (grapeseed, sweet almond, apricot kernel, olive, etc.)
  • 1/3 cup solid oils (coconut oil, shea butter, cocoa butter, mango butter, or other oils that are solid at room temperature.)
  • 1/2 ounce grated beeswax (There are vegan wax substitutes. Just make sure they are good for skin care.)
Group 2 Ingredients (waters)
  • 1 cup distilled water (or combination of distilled water, hydrosols, aloe vera gel, herbal teas)
  • Essential oils, if desired.  I generally use about 10-15 drops per recipe.  Use whatever combination pleases you, but make sure that the essential oils you choose are also good for skincare. If you are sensitive to scent, just leave it out and the creme will smell of beeswax—which I love.
Group 1: There are lots of quality oils—borage oil, evening primrose oil, calendula infused oil, etc.,—that are suitable for different skin conditions and problems. They may be a bit pricier than other oils, but even substituting a small amount of one of them can change the creme in ways your skin will love. You can add small amounts of Vitamin E oil by piercing a couple of Vitamin E capsules, and squeezing it into the oil ingredients. You can start by using less expensive oils—olive oil, apricot kernel oil, and sweet almond oil—for a large part of the recipe, and then use a tablespoon or two of pricier oils to add a little extra to your creme. 

Group 2: The water mixture can include distilled water, hydrosols (lavender, rose, orange blossom), herbal teas, etc. Please don't use tap water because it can introduce bacteria that may cause your creme to mould. The water mixture can also include aloe vera gel. When using aloe vera, use purchased gel, not the fresh plant. The fresh plant can also introduce bacteria to your creme. It is important not to use aloe, or creme made with aloe, on staph infections. Although aloe is excellent for many skin infections, it provides a perfect medium for staph to grow in, and will actually spread the infection. If you want to use aloe gel or hydrosol, only use 1/3 cup, and use water for the remaining 2/3 cup

Please note before blending Group 1 into Group 2
  • The basic proportions of the creme recipe should be about one part Group 1 (oils) to one part Group 2 (waters).
  • In Group 1, the oil proportions should be approximately 2/3 cup liquid oil and 1/3 cup solid oil.
To Make:
Step 1 — Melt Group 1 ingredients over low heat in a double boiler (glass measuring cup in a pot half-filled with water). Heat the ingredients just enough to melt them. Never use a microwave to melt your oils. It will destroy the beneficial properties of the oils.


Step 2 — Remove the cup with the heated oils from the pot, and let cool to room temperature. This can take a few hours, so I often let it sit overnight alongside the waters so they are both the same temperature. This is key to successfully emulsifying the ingredients.


Step 3 — At this point, the Group 1 ingredients will be very thick, and somewhat firm.  Stir them up a bit, but leave it in the glass cup (as long as the cup is twice as large as the total recipe—in this case that would be a 4 cup container).  Pour all the waters into the same cup, along with the essential oils, if using. Mix by moving the stick blender up and down through the ingredients. You can easily over-mix this way, so I always have the stick blender on as I push it down, then leave it off as it pull it up. This allows you to easily move it around for even mixing, but prevents over-mixing. You want creme, not a kind of butter!

Step 4 — Pour into sterilized creme or lotion jars, and store in a cool place. This creme should not go bad stored at room temperature.  However, if you make more than you can use in a month or two, I recommend storing the extra in the fridge.


Notes:
  • You will only need a very small amount of this creme at a time—much less than with commercial cremes and lotions. If you use too much, your skin will not absorb it all, and it will feel oily.
  • Make sure that your hands are clean before sticking your fingers into your creme.  Dirty hands can also add bacteria to the creme, causing it to spoil
  • Don't leave your creme in a hot car, or any other area that will cause it to become overly hot. The oils and waters will separate. Also, there are no preservatives in the creme, and it is an oil-based product, so it's possible for it to become rancid. 
  • If your creme does become rancid, throw it out! Your skin is one big absorbing organ, and I know of cases where using rancid creme caused the person to develop a severe sensitivity to the ingredients of the creme.


Wednesday 18 May 2022

Egg on a Nest of Hash Browns, with Bacon


While I don't have it often, I do love bacon, and it always seems a shame to me that there is all that bacon fat leftover. I've tried saving it in the fridge, but I usually forget about it. This recipe takes care of all that. First you fry the bacon, then you use the bacon fat to fry the hash browns — easy and delicious!


Egg on a Nest of Hash Browns, with Bacon


Yield: One serving


Ingredients

  • 2 slices bacon
  • 1 medium potato, shredded
  • 1 egg
  • Cheese (I used Jalapeno Monterey Jack)
  • Green onions
  • Salt, pepper, and other seasoning of your choice


Method

  • Put the bacon in a cold cast-iron frying, and heat to medium. Fry until as done as you like it, turning when needed.
  • Remove bacon and put on a plate lined with paper towel.
  • Leave the bacon fat in the frying pan, and add the shredded potatoes along with snipped onion greens. Season with salt, pepper, and basil or oregano. Cook at medium heat until the potatoes start browning at the bottom.
  • Flip the shredded potato over in one piece. Press down a little in the middle to make a nest, and break the egg on top. Season with salt and pepper, and lay a slice of the cheese of your choice over the egg. 


  • Turn the heat off, and cover the pan with a lid. Leave for 10 minutes to complete cooking.


And this recipe is easily doubled, tripled, etc.


Friday 13 May 2022

Little House on the Prairie rug


10 x 11" Little House on the Prairie rug — this one's for me.  :)

I grew up outside the city, and it's been my dream for a long time to move out of the city again. I don't want or need a big house, but it would be nice to live in a small house with a garage, and with neighbours nearby.


Friday 8 April 2022

Handmade Shoes!


Yes, I make shoes for myself.  My feet are B width, but the heels are A width, meaning that shoes that fit me at the front, slide off the back.  So I can't wear slip-on shoes, only shoes with a strap or ties.  Until I made my first pair of slip-on shoes sized in every way for my particular feet, that is.  And I love them.

Making the pattern for your foot is a long involved process, but to me it was worth the effort.  I don't have a whole lot of shoes, but the ones I have now fit me well, and they don't squish my toes, or have plastic inserts around the toes to prevent the leather from stretching — everything I don't like about store bought shoes.  You can see the slip-ons on the right, and my first pair of tie shoes on the left.  They are both very comfortable to walk in.  They are both made of leather. Vinyl, or fake leather cause my feet to burn, just like most man-made fibres.  Give me natural materials every time.


I am almost finished another pair of tie shoes that are a precursor to making myself a pair of lined winter boots starting with the same basic pattern.  There's a lot of measuring involved, and you have to make a mock up to make sure the pattern will fit the way you want it to, but it's worth it.  And it's another creative outlet.  Every time I do it, I learn more, and I have a better idea of what will work for next time.  After the boots, I think a new pair of sandals because my last store bought pair are very worn...

Wednesday 16 March 2022

Prairie Sun(flower) Rug


This is a Christmas gift for a friend who is also a maker.  When that happens, you know that the receiver appreciates the gift even more!

It measures 10 x 11"


Tuesday 22 February 2022

Garden Guardian Rug


 I started this rug before Christmas, with little detours to side projects, but it is now done.

Last summer, there was a volunteer sunflower in my garden that didn't grow that tall, but had an extremely sturdy thick stem—a couple of inches thick, for sure. Sunflowers generally eventually turn face down because of the weight of the flower and the seeds, but not this one. Even at the end of the season, it faced the sky. It was glorious, and the seeds must have been very tasty, because they were gobbled up quickly.

In my mind, I called this sunflower the Garden Guardian. I don't know why—it just popped into my head, and it felt right. So this is my homage to that sunflower.

Sunday 20 February 2022

Cheesy Pinto Bean Quesadillas


I have to admit that pinto beans are my favourite kind of dried bean.  Whenever a recipe asks for black beans or kidney beans, I substitute pinto beans. I don't mind black beans but when I try to cook them, they never seem to get soft, no matter how many hours I simmer them. Of course, I never buy cans of precooked dried beans because it is so easy to soak and cook them at home. Maybe if I tried the precooked canned black beans, I would change my mind - but probably not. The top picture shows the quesadillas after they are baked.

If you'd like to try your hand at making gluten-free oat flour tortillas, which is what you see in these pictures, you can find the recipe here
 

Spicy Pinto Bean Quesadillas


Yield: about 8, depending on size of your soft tortillas


Ingredients

·      1 tablespoon olive oil

·      1 onion, chopped

·      1 teaspoon cumin

·      ¼ teaspoon cayenne powder or ¼ teaspoon chipotle powder

·      ¼ teaspoon pepper

·      ½ teaspoon sea salt

·      1 - 19 oz can (or 2 ½ cups) pinto beans, drained

·      ½ cup frozen corn kernels

·      large gluten-free tortillas

·      cheddar cheese, shredded

·      sour cream


Method

·      Preheat oven to 425 F, and cover a baking sheet with parchment paper.

·      In a large frying pan—I like cast iron—heat oil over medium heat. Add onions, cayenne, chipotle, cumin, salt, and pepper. Cook, stirring occasionally, until onions are softened—about 8 minutes.

·      Add pinto beans and corn and cook, stirring frequently, until heated through—about 5 minutes.

·      Place about ½ cup of the bean mixture over half of each tortilla, sprinkle with cheese, and then fold the tortilla in half. If it doesn’t want to stay there, I found that using a wooden toothpick can help hold it in place. Place on prepared baking sheet.

·      Bake in oven until golden, about 10–15 minutes.

·      Serve topped with sour cream.

·      Freeze the bean mixture in sealed containers in whatever portion size you choose.


This recipe takes very little time if you already have the tortillas, and it is a filling and satisfying meal. You'll notice that I put cayenne or chipotle powder in the ingredient list. That's because a little goes a long way with these dried peppers, and I found it a little over the top to have both. But you may not agree. I do love the smoky flavour that chipotle (smoked dried jalapeno) powder imparts. Regardless of your choice, having a little chocolate afterwards is a lovely finish, and helps cool the heat.


Thursday 20 January 2022

Name Change

Dear Readers,

I am changing the name of this blog to What These Hands Make.  Just to let you know so you won't wonder why you are getting a link to a blog that isn't familiar to you.


I also just noticed that for some reason the pics to some of my post have disappeared.  I will be fixing that quickly.


Thanks for joining me in my adventures...

Tuesday 11 January 2022

Oat Flour Tortillas


I found this recipe on Oats Every Day.  This is a site from the Prairie Oat Growers association, and it has a good assortment of recipes using oats and oat flour. Many of them could easily be made gluten-free simply by substituting gluten-free oats.  Oat flour can be a little tricky, but these oat flour tortillas are surprisingly easy to roll out thinly, and I put them in the freezer in a plastic bag after cooking without them sticking together.  I could take one out at a time with no problem.  The finished tortillas are also just as flexible as they should be, even after freezing.


Oat Flour Tortillas


Yield - 8 tortillas


Ingredients

  • 2 1/4 cups (225 gm) gluten-free oat flour
  • 1 teaspoon salt
  • 1 cup water (cold)


Method

  • In a large bowl, stir together the flour and salt.  A whisk is helpful because oat flour tends to clump.
  • Add the cold water slowly, starting with 3/4 cup, and mixing with a fork, like you do for pastry, until a dough is formed.  If it is crumbly, add a bit more water.  If it is sticky add a little more flour.
  • Put the dough on a surface lightly dusted with oat flour.  Knead until smooth.
  • Divide into 8 balls and let rest, covered with plastic, for 10 - 15 minutes.
  • Working with one ball at a time, roll out on parchment paper until you have a thin, round tortilla. Roll from the centre out, rotating the dough.  Stack tortillas between sheets of parchment paper or plastic and cover with a dampened tea towel until all are rolled out.  You don't want them to get dry.
  • In a dry, non-stick pan (I like cast-iron) cook the tortillas over medium-high heat, one at a time for 30 - 60 seconds per side. Stack and keep warm on a plate - cover them with foil.